Encrypting a complete disk under ML
20.01.13
By chance I came across an article (don’t have a link anymore, sorry) that showed how to completely encrypt a disk under Mountain Lion if that disk isn’t the one that was booted from. I have a MacBook Pro with an SSD in the regular SATA mount and a 640GB hard disk mounted in place of the DVD drive (see here for the story on that).
For quite some time, I’d been using an encrypted DMG that would mount as a data drive for my more sensitive files, but that is quite a pain in the rear end. For one thing, you need to figure out how much space you need, because you have to pick a finite size for the DMG as you create it. So either it wastes (a lot of) disk space when not filled up or you end up having to create a bigger one and moving all your files from one to the other if it gets too small.
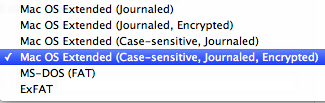
The advantages of a hard disk that is completely encrypted are obvious since Lion, which introduced FileVault for the primary disk. Getting secondary disks to be encrypted under ML is not an issue if you’re formatting them - FileVault 2 takes care of that with a click in the selection list:
I’ve done this with another drive I have and it worked like a charm. But what to do if you have a 640GB drive nearly 90% filled with stuff you don’t want to be moving someplace else so that you can re-format your drive?
Well, as it turns out, there is a way to do this from the command line using diskutil - see this article. As the article states, it really does take VERY LONG to do this on-the-fly encryption. At first, I was a bit uneasy, as nothing seemed to happen, but there is a way to check on progress and after a good 20 hours, my drive was encrypted.
You can check how things are progressing with diskutil cs list, which gives you a list of all devices, including the current disk chunk converted:
| +-> Logical Volume Family 5C25AA1F-0EBE-49A6-A644-BBDBF988E421
| ----------------------------------------------------------
| Encryption Status: Unlocked
| Encryption Type: AES-XTS
| Conversion Status: Converting
| Conversion Direction: forward
| Has Encrypted Extents: Yes
| Fully Secure: No
| Passphrase Required: Yes
| |
| +-> Logical Volume C52CBE5D-0065-467E-A180-6512A52CB46F
| ---------------------------------------------------
| Disk: disk3
| Status: Online
| Size (Total): 638939721728 B (638.9 GB)
| Size (Converted): 392502968320 B (392.5 GB)
| Revertible: Yes (unlock and decryption required)
| LV Name: Macintosh HD
| Volume Name: Macintosh HD
| Content Hint: Apple_HFS
The converted drive works like a charm, I didn’t notice any slow-down of my system afterwards.
The only caveat - at least I haven’t found a solution yet - is that if you have moved your user folder to this drive (which is the sensible thing to do if you have a small SSD that you boot from and a large HDD to keep data on), you will have to create an admin account that you can use to unlock the HDD after a reboot.
I.e.: log into the admin account, unlock the HDD (ideally saving the password in the admin’s keychain), then log out and log into your regular account.
Not a big issue, really.
For quite some time, I’d been using an encrypted DMG that would mount as a data drive for my more sensitive files, but that is quite a pain in the rear end. For one thing, you need to figure out how much space you need, because you have to pick a finite size for the DMG as you create it. So either it wastes (a lot of) disk space when not filled up or you end up having to create a bigger one and moving all your files from one to the other if it gets too small.
The advantages of a hard disk that is completely encrypted are obvious since Lion, which introduced FileVault for the primary disk. Getting secondary disks to be encrypted under ML is not an issue if you’re formatting them - FileVault 2 takes care of that with a click in the selection list:
I’ve done this with another drive I have and it worked like a charm. But what to do if you have a 640GB drive nearly 90% filled with stuff you don’t want to be moving someplace else so that you can re-format your drive?
Well, as it turns out, there is a way to do this from the command line using diskutil - see this article. As the article states, it really does take VERY LONG to do this on-the-fly encryption. At first, I was a bit uneasy, as nothing seemed to happen, but there is a way to check on progress and after a good 20 hours, my drive was encrypted.
You can check how things are progressing with diskutil cs list, which gives you a list of all devices, including the current disk chunk converted:
| +-> Logical Volume Family 5C25AA1F-0EBE-49A6-A644-BBDBF988E421
| ----------------------------------------------------------
| Encryption Status: Unlocked
| Encryption Type: AES-XTS
| Conversion Status: Converting
| Conversion Direction: forward
| Has Encrypted Extents: Yes
| Fully Secure: No
| Passphrase Required: Yes
| |
| +-> Logical Volume C52CBE5D-0065-467E-A180-6512A52CB46F
| ---------------------------------------------------
| Disk: disk3
| Status: Online
| Size (Total): 638939721728 B (638.9 GB)
| Size (Converted): 392502968320 B (392.5 GB)
| Revertible: Yes (unlock and decryption required)
| LV Name: Macintosh HD
| Volume Name: Macintosh HD
| Content Hint: Apple_HFS
The converted drive works like a charm, I didn’t notice any slow-down of my system afterwards.
The only caveat - at least I haven’t found a solution yet - is that if you have moved your user folder to this drive (which is the sensible thing to do if you have a small SSD that you boot from and a large HDD to keep data on), you will have to create an admin account that you can use to unlock the HDD after a reboot.
I.e.: log into the admin account, unlock the HDD (ideally saving the password in the admin’s keychain), then log out and log into your regular account.
Not a big issue, really.
Comments
iTunes remixed - hopefully not a trend!
17.12.12
Okay, Apple comes out with a new version of iTunes and what do you do? You update your iTunes on your Mac, of course. For the past few years, iTunes has undergone a number of changes, most of them for the benefit of the user (and Apple, of course).
This latest version of iTunes - Version 11 - for the first time represented a major step back for me. Why? The changes in the UI, in the very core of how the software is used, are so massive that I can’t stop asking myself: “why change a running system, Apple?”
What’s the deal with mixing up music videos and regular MP3 or AAC songs? I was listening to some ambient music while working on a marketing piece when, all of a sudden, the music style did a 180° as Fettes Brot “Jein” started playing. What irritated me more than the sudden genre change was the movement I suddenly noticed behind the word processor window: it wasn’t just a song - it was a music video.
This is because iTunes 11 has a “Songs” … well, what do you call it? “Mode”? “Tab”? … whatever. Do we really need for iTunes to start mixing video and audio together like that? I guess if you’re looking for a Genius mix to play at a party, then it’s irrelevant wether you just listen to the music video audio or actually look at the video content.
This new (okay, folks, what is this new mode selection called? I don’t have a word for it, though Apple likely does) … “tab” … represents what irritates me most about version 11: the apparent need to make the view and selection of content “multi-dimensional”.
Personally, I don’t need it. When I want to hear ambient music, I knew how to select that in a matter of a few clicks in pre-11 iTunes; if I wanted to view a music video - ditto. Now, I can’t even get a movie, purchased via iTunes, to automatically load on my iPad without syncing it with my Mac.
What gives, Apple?
I loved Steve Jobs’ “simplicity of use” … under Tim Cook, it seems Apple is slowly but surely turning its bread-and-butter software into just another usage-disaster like Windows…
Tipp: Auto Paragraphs in Word for Mac
06.09.12
Ever since using Microsoft Word for Windows, it seems the default setting for paragraphs in the Standard format was to have no space whatsoever between two paragraphs. As I prefer to have a 6 point space between paragraphs, I would set up a “Paragraph” format and save it in my normal.dot file.
Since using Word on the Mac, I found an interesting function that is not really intuitive: an automatic spacing function for paragraphs! The two screen snaps are in German, but don’t let that irritate you. The default setting for spacing before or after a paragraph is zero:

You can put in any number you wish (within reasonable limits), but certainly not a negative one. Subsequently, you wouldn’t normally think to click on the down arrow here, but if you do - lo and behold - you get something interesting:
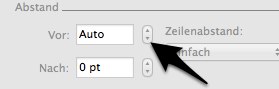
the setting goes from a digit (followed by “pt” for “point”) to “Auto”. This works for “After paragraph” as well. The results are - so far - exactly in line with my preference. Normally, there should be a checkbox “Auto” here, graying out the digit entry field, which would make the ergonomics simpler, but such is life.
I tested Word for Windows as well, and guess what: it works there too!
Since using Word on the Mac, I found an interesting function that is not really intuitive: an automatic spacing function for paragraphs! The two screen snaps are in German, but don’t let that irritate you. The default setting for spacing before or after a paragraph is zero:
You can put in any number you wish (within reasonable limits), but certainly not a negative one. Subsequently, you wouldn’t normally think to click on the down arrow here, but if you do - lo and behold - you get something interesting:
the setting goes from a digit (followed by “pt” for “point”) to “Auto”. This works for “After paragraph” as well. The results are - so far - exactly in line with my preference. Normally, there should be a checkbox “Auto” here, graying out the digit entry field, which would make the ergonomics simpler, but such is life.
I tested Word for Windows as well, and guess what: it works there too!
Contacts Bugs in Mountain Lion
05.09.12
This issue is reproducable and obviously related to what I described in this post:
Dragging a picture, for example off a LinkedIn profile, into Contacts makes the cursor change to a green + when hovering over the picture drop zone, but letting go makes the picture “fall back” to whence it came from.
If I save it to disk (dragging it to a folder works fine) and then drag it from there to the contact I want it displayed in, the framing dialog comes up. In one instance, hitting “Done” didn’t do a thing. I had to switch back to Safari and then drag the picture to Contacts again to make it work.
The second bug comes after syncing the changes to iCloud: while the algorithm that pics out the face works well as usual in automatically cropping even large pictures, the picture contents “snap back” to the original, full-size picture contents once the contact is synced.
I’m very much looking forward to the next Mountain Lion Update (with hopes of having things fixed in there).